24 Most Essential Things To Do After Installing WordPress

So, you have installed WordPress, and now just wondering what are some essential settings after installing WordPress and just landed upon here. Or if you haven’t installed WordPress yet, and planning to do so, do check my detailed guide on building a blog with WordPress.
Nowadays, almost every hosting company provides a 1-Click install solution. So, installing WordPress is probably the easiest part of your blogging journey. But, this is just the beginning. You need to do some changes in your settings, install and configure some essential plugins, create the essential pages, and many more tasks for your blog before diving into the process of content creation.
A fresh installation of WordPress comes with some dummy data, dummy settings, dummy plugins, etc. You need to fix those to make your blog more professional, user-friendly, and obviously, search engine friendly.
In this article, I will discuss the most essential things to do after installing WordPress
ARTICLE CONTENTS
1. Delete The Default Admin Username
Some auto-installer services install WordPress with the default ‘Admin’ username. Hackers can easily guess your username and try to get your password.
To avoid this, create a user with any other name, give Administrator privileges to that account, and delete the default ‘Admin’ username.

And, do not forget to set a strong password for your blog.
2. Change The Title, Tagline, and Timezone
Go to the Settings section in your dashboard and choose General. Change your site title ‘My WordPress’ to your blog name and replace the tagline ‘Just Another WordPress Site’ with your own.

Scroll down and set your time zone as per your local time. Setting the time zone will help you show the accurate post date and time and schedule your posts.
3. Check and Change The Permalink Structure
Permalinks are the URLs of your pages and posts published on your WordPress site. From the SEO perspective, URLs are the most important part of your site. Therefore, checking and changing as necessary is one of the most important things to do after installing WordPress.
By default, WordPress permalink has the URL structure https://yourdomain.com/?p=123, which is pretty ugly and not SEO friendly too.
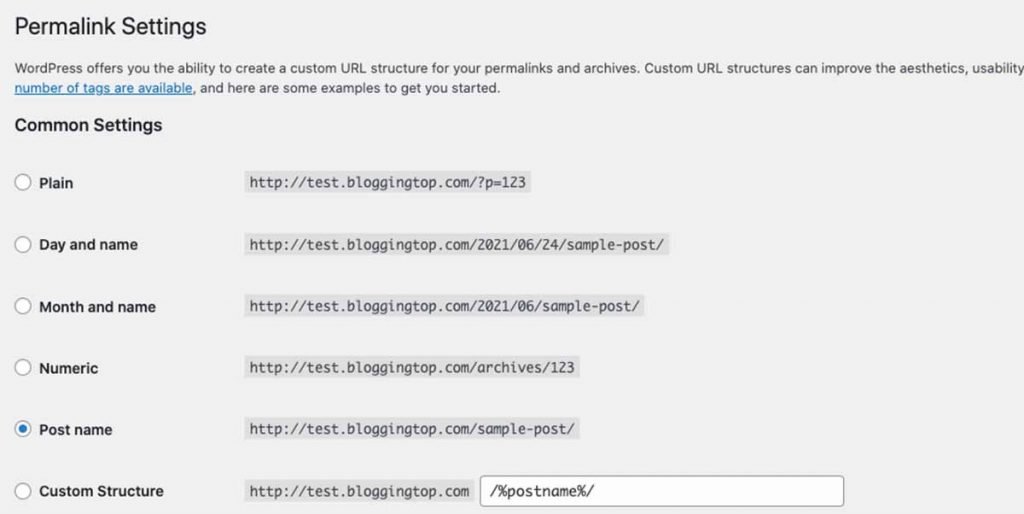
To change it, go to Settings and then select Permalink from the menu. There you will find a few different choices for setting a new structure. The best option for this purpose is to set the permalink structure as ‘Post Name’. If you are going to post similar titles that are date or time-sensitive, then you may choose the ‘Day and Name’ option.
4. Delete Dummy Post, Page, and Comment
A fresh installation of WordPress comes with a dummy page, a dummy post, and a dummy comment.
After installing WordPress, go to Posts and then select All Posts. here you will see a post with the title ‘Hello World!’. Delete it immediately.

Similarly, in the Pages section delete the ‘Sample Page’ and in the Comment Section delete the dummy comment from ‘Mr. WordPress’.
5. Set a Favicon for Your WordPress Site
Favicon is the small little logo or graphic that shows up in your browser tab along with your site title. Though it is a small thing, it gives your website a professional look.
Make a favicon of dimension 512px X 512px, go back to WordPress dashboard, click on Customize link under Appearance tab. There you will have a ‘select image’ option under the Site Identity section. Upload your favicon there and save the theme.

You can make a favicon using image editing software or use online tools like favicon.io. Make sure that the favicon represents your site identity.
6. Complete Your User Profile
Take two extra minutes to fill up your user profile. Fill out the Name, Contact Info, & Author Bio section.
There is also a drop-down option that allows you to change your publicly displayed name. By default, it is set to your username. Set it to either your first name, last name or nickname so that it matches your identity.

While setting up the email, do not forget to use your Gravatar email. It will automatically synchronize and set your profile picture from Gravatar.
7. Modify Discussion and Comment Section
Setting up the discussion and comment section is one of the important things to do after installing WordPress.
Go to Settings and click the Discussion link. Check the boxes ‘Break comments into pages with 50 top-level comments per page and the page displayed by default’ and ‘Comment must be manually approved’. You may take reference from the above screenshot.

Scroll down and in the Avatar section set default Avatar as Gravatar Logo.
8. Set Up Your Gravatar Profile
Gravatar simply stands for Globally Recognized Avatar. Globally recognized means millions of people and websites use them. It is an image that appears beside a blog comment made by you. It represents your identity.
Go to gravatar.com and create one for yourself. It not only reveals your identity but also puts added value to the comments you made on other blogs.

Gravatar is directly linked with the email ID used for profile creation. Therefore, while commenting on other blogs, do not forget to use the email associated with your Gravatar profile.
9. Set Up Spam Protection
As blogging has become a lucrative career option, the Internet world is getting full of spammers. If you do not activate spam protection for your blog, your comment moderation page will soon be flooded with spam.
Personally reviewing and detecting spam comments is a tedious job. Akismet comes with WordPress installation which eliminates comment and Trackback spams without your interaction. If somehow it is not installed automatically, install it from the Plugins section.

To activate Akismet, you need an API key. It is free and you can get it from Akismet.com after signing in with your wordpress.com account. After getting the API key go to Akismet Configuration and enter the API key to activate it. It is one of the important things to do after installing WordPress.
10. Check Your Admin Email
Sometimes the auto-installer app provided by your hosting company may set the email used for your hosting account as the admin email of your WordPress site. It may not be the same with your desired admin email.
Go to Settings > General and check the administrator email address assigned to your WordPress site. You can change it from there.

Do not forget to check the confirmation email received in your mailbox. The new email address will not become active until you confirm.
11. Edit Default Category
Each WordPress post needs a category to be assigned. If you somehow forget to assign a category, WordPress will automatically assign the default category.
By default, WordPress used ‘Uncategorized’ as its default category. It’s obvious that, if your post is assigned to ‘Uncategoriezed’ category, it will loose some quality.
To overcome this issue, you need to set a default category of your own. There are two ways to do that.
With the first option, you have to create a new category under Posts > Categories. Then in the Writing section of the Settings tab, you will find the option to set your default category. Set it to your new category and leave the ‘Uncategorized’ category untouched.

On the other hand, you can simply edit the ‘uncategorized’ category under Posts > Categories. But, do not forget to edit the slug also.

12. Set Up a Contact Form
Your website visitors need a provision to send messages to you directly if they need. Here comes the importance of Contact Forms. It helps users to contact you just by filling out a form.
Unfortunately, WordPress installation does not come with a Contact Form integration. You need to install a third-party plugin for that.

WPForms is the best option available for this purpose. It is a simple yet powerful form builder plugin. However, you do not need to purchase the premium version to start out. You can install the free version of WPForms which provides all essential functionalities.
13. Set Up a Theme and Delete Unused
The WordPress installation comes with a very basic layout. To give some professional touch, you need to set up a theme for your website.
There are plenty of free themes available which can be downloaded right from your WordPress dashboard. You may choose from those free themes available or if you need a more professional look and support, go for a premium theme.
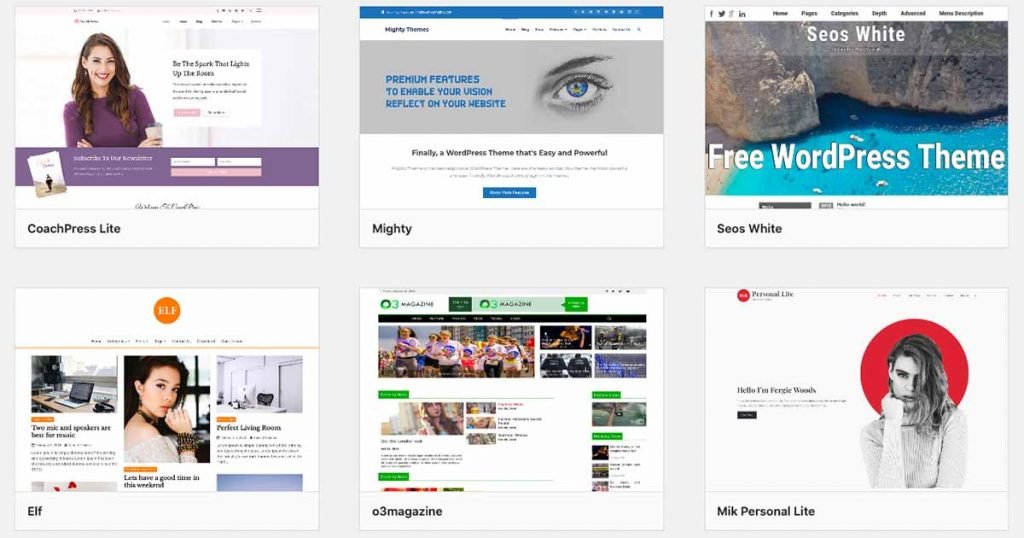
It’s always been a better idea to go for a premium theme. From a quality, functionality, and security point of view, choosing a premium theme is the only solution.
Though there are many options to choose from, selecting the right one according to your need is important. Some of my favorites are as follows,
StudioPress (Genesis Framework): If you are looking for a FREE, lightweight, minimalist, and actually SEO Friendly theme, go for Genesis Framework. Genesis Framework is perfect for mid-range hosting plans, as it loads within seconds. You can start out with the free Genesis child theme and later upgrade to a premium StudioPress theme.
Elegant Themes: Elegant Themes is on the market for a long time. If you are looking for an elegant looking theme with so many functionalities, go for it. The best thing about Elegant themes is that the subscription includes 2 themes and 3 plugins to supercharge a blog. Read my complete review of Elegant Themes. Being a BloggingTop reader, you are eligible to have 20% Off with the Elegant Themes subscription.
WordPress installation comes with some preinstalled basic themes like Twenty-Twenty, Twenty-TwentyOne, etc. After setting up a theme for your site, do not forget to delete the unused themes, as those will consume unnecessary space and might slow down your site.
14. Set A Navigation Menu
A menu helps users to navigate through your site. It is the showcase of the most important parts of your site.
By default, a WordPress theme creates a navigation menu automatically by assigning the existing pages on your site. But, it is not a good idea to build a menu for your site in such a way.
To create a custom menu for your WordPress site, go to the Menus section on the Appearance tab.

You can create multiple menus for different navigation locations available on your theme such as header location, footer location, etc.
15. Set Up Your Home Page
By default, WordPress showcases your latest posts on the homepage. It is fine if you are running a simple blog. But, if you are running a small business website, it is not a good idea to set your homepage as the posts page. Rather, you need to create a static page containing all important information.
Nowadays, even most bloggers want to use a static page where they can showcase their recent works and important sections of their blogs. And, obviously, it looks more professional.

To set a custom homepage, go to Settings > Reading and set your homepage as a static page. You can even assign a separate blog page for your site.
16. Remove Dummy Widgets
WordPress installation automatically creates some dummy widgets on your site. Widgets such as Meta, Archives are outdated and unnecessary.
Go to the Widgets section on the Appearance tab and remove the unnecessary widgets and create your own.

You can publish advertisements, custom menus, subscription forms, and other useful resources within your widget area.
17. Create Essential Pages
If you have started a brand new website, it’s obvious that no-one knows about you, your business model, etc. Therefore, it is necessary to create the basic pages containing information about you and your website.
Even these basic pages are essential if you are planning to publish advertisements on your site. Giant Ad publisher programs like Google AdSense do not accept a site without having pages containing the basic information.

Creating the following basic pages is one of the most important things to do after installing WordPress,
About Page: Visitors have a tendency to know more about who the people are behind the website. About page is to serve their inquisitive minds. An about page is probably the most visited page of any website.
Contact Page: This page is for those who want to contact you directly. Insert a contact form to help users to contact you easily.
Privacy Page: A privacy policy is a page contained on a blog that details how the operators of the blog will collect, store, protect, and utilize personal data provided by its users.
Blog Page: If you are running a small business website, it is essential to run a blog. With more blog content, the possibility of search traffic increases and hence increases your brand’s visibility. Create a blog page for your website to showcase the latest blog content.
18. Set Up Google Analytics
Being a website owner, it is essential to track your website visitor’s interests, demographics, and other behaviors. It helps you in scaling up your business.
Google Analytics helps you in tracking your website’s traffic. It helps you to understand what your visitors are looking for, which countries they belong to, they are organic or direct, and much more.
If you are willing to integrate Google Analytics with the easiest method, install MonsterInsights Plugin. With this plugin, you can track visitors’ statistics right from the WordPress dashboard.

To connect MonsterInsights with Google Analytics, you need to add your web property to your Google Analytics account and follow the plugin setup wizard. Here is a great article on Installing Google Analytics in WordPress.
19. Set Up a Caching Solution
In simple words, caching is the process of creating static versions of your website contents and serving that to visitors. It is the best practice to improve the speed and performance of a website.
Caching helps in loading your website faster by serving static cached files. If there is no caching solution for a website, the dynamic database queries will take time and this leads to a slow loading site.
Caching is essential for websites that run on limited hosting plans. It can save server memory by eliminating dynamic database queries.
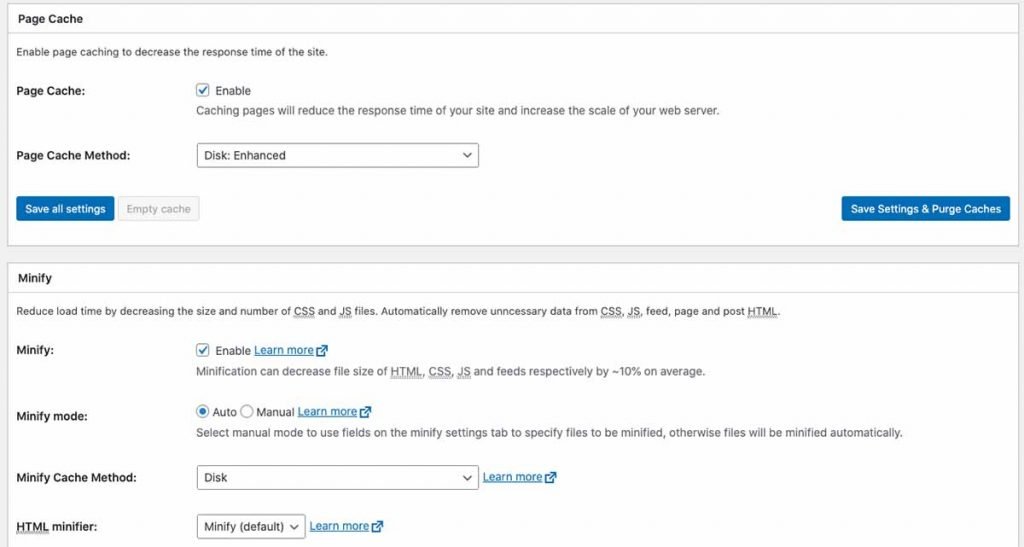
Though there are several free plugins available for caching, I recommend you to use the W3 Total Cache plugin. It is the fastest and most complete WordPress performance optimization plugin.
20. Install an SEO Plugin
SEO stands for Search Engine Optimization and every website owner knows the importance of it for a website. No website can survive without implementing Search Engine Optimization, especially when the targeted traffic is organic.
WordPress, despite being the most SEO-friendly CMS, to optimize further and get the most out of your WordPress site, you need to install an SEO plugin.

If you are tight on budget, I recommend installing Rank Math for this purpose. Though it is relatively new in the market, within a few years of its launch, it has been able to get attention from many SEO professionals. Rank Math provides all the premium features that Yoast SEO Premium offers, and all those for FREE.
21. Set Up WordPress Security
With almost 4.6 billion internet users around the world, security threats to websites are growing day by day. If you do not ensure security measures for your WordPress site it is likely to get hacked easily.
Sometimes the basic practices of WordPress security such as setting up a strong password, securing the admin area, are not just enough. There are so many other ways to get hacked.
Hackers may try to inject malicious codes inside your WordPress core files, intending to generate revenue from your traffic or to get leads towards malicious apps and websites. They can silently destroy your site or hijack its audience.
Why take chances? After all, prevention is better than cure!

You can always start out with a free plugin like BulletProof Security, but to ensure the best security measures, I recommend you to use Sucuri. It is an incredibly solid security platform.
22. Plan Your Backups
Imagine that you have a blog with hundreds of posts and somehow unintentionally you have deleted some and you do not have backup. What will you do?
Or, you are trying to change some codes in your website core files and everything got messed up. What will you do if you do not have a backup?
Being a website owner, you should always be ready to deal with these types of unwanted situations.
Not only to prevent data loss, taking regular backup of your site helps you in protecting your site from hackers. It can help regain control of your site after being hacked.
Despite having a lot of plugins available to ease your backup process, I recommend using UpdraftPlus. It is the best free plugin to take care of your backup process.

You can have even more features and automate your backup process with the help of UpdraftPlus Premium.
23. Start Building Email List
Email Marketing is regarded as the most reliable method to generate loyal audience for your website.
Users get enrolled in your email list only when they are interested in hearing more from you. The very first readers of your new content are your subscribers. They are the most valuable returning visitors of your site.
The best thing about email subscribers is that if somehow your site got penalized by the search engine, you still have the chance to collect revenues from affiliate products by sending a personalized email.

You can start using premium Email Marketing Services like MailChimp and ConvertKit without investing a penny. Both these email marketing services offer a free plan to start with.
24. Integrate Social Sharing Options
Two-third of the total internet users are active on social media platforms. It is no doubt a huge market to promote your business and content.
To promote your website and build a following base on Social Media, you need to integrate the social sharing option on your WordPress site.
People are a bit lazy! Even if they like your content, they do not like to copy your URLs and share them on social media. Rather, they are interested in automating the process just by pushing a button.
There are several plugins available to integrate social media functionality into your site that allows visitors to share your content with others in their network.

To just start out, you can use the social sharing option provided by the Jetpack Plugin. And if you need more functionality and flexibility, you can try Monarch Social Sharing Plugin.
I have tried to cover here the most essential settings you have to tune after installing WordPress. Hope this article helped you in learning things you need to do with your brand new WordPress site.
If you are jumping into the blogosphere to share your knowledge, do check these 12 mistakes most bloggers make and eventually ruin their blog.
If you liked this post, please do not hesitate to share. If I have missed an essential setting, do let us know in the comment section.


